Table of Contents
- Downloading and Installing yuzu
- Hardware Requirements
- yuzu Quickstart Guide
- Prerequisites
- Preparing the microSD card
- Booting into RCM
- Booting into Hekate
- Mounting the microSD card to your computer in Hekate
- Dumping Prod.keys and Title.keys
- Backing up Switch NAND (Optional but Recommended)
- Dumping System Update Firmware
- Dumping Cartridge Games
- Dumping Installed Titles (eShop)
- Dumping Save Files (Optional)
- Rebooting the Switch Back to its Original State
- Running yuzu
Downloading and Installing yuzu
Hardware Requirements
CPU:
Any x86_64 CPU with support for the FMA instruction set. 6 threads or more are recommended.
-
Minimum: Intel Core i5-4430 / AMD Ryzen 3 1200
-
Recommended: Intel Core i5-10400 / AMD Ryzen 5 3600
Dedicated graphics:
OpenGL 4.6 or Vulkan 1.1 compatible hardware and drivers are mandatory. Half-float support and 4GB of VRAM are recommended.
-
Minimum for Linux: NVIDIA GeForce GT 1030 2GB / AMD Radeon R7 240 2GB
-
Minimum for Windows: NVIDIA GeForce GT 1030 2GB / AMD Radeon RX 550 2GB
-
Recommended: NVIDIA GeForce GTX 1650 4GB / AMD Radeon RX Vega 56 8GB
Integrated graphics:
Integrated graphics will produce very low performance. A dedicated GPU will produce better results on all scenarios. This is only for listing iGPU support.
-
Minimum for Linux: Intel HD 5300 / AMD Radeon R5 Graphics
-
Minimum for Windows: Intel HD Graphics 520 / AMD Radeon Vega 3
-
Recommended: Intel UHD Graphics 750 / AMD Radeon Vega 7
RAM:
Since an integrated GPU uses system RAM as its video memory (VRAM), our memory requirement in this configuration is higher.
-
Minimum with dedicated graphics: 8GB
-
Minimum with integrated graphics: 12GB
-
Recommended: 16GB
Notes:
-
Windows users are recommended to run Windows 10 1803 or newer to get the best performance.
-
Our recommended specifications don’t guarantee perfect performance in most games, but rather strive to provide a cost effective recommendation while still considering performance.
-
Most games are playable on older Nvidia GPUs from the Fermi family (400 series) or later, but at least Pascal (1000 series) is strongly recommended.
-
CPUs lacking the FMA instruction set will produce very poor results. Intel Core gen 3 series or older, AMD phenom II or older and all Pentium/Celeron/Atom CPUs will not produce optimal results.
-
Mobile CPUs will not reach the same performance as their desktop counterparts due to thermal, power, and technical limitations.
-
Old GCN 1.0 and GCN 2.0 Radeon GPUs on Linux require manually forcing the amdgpu kernel module.
-
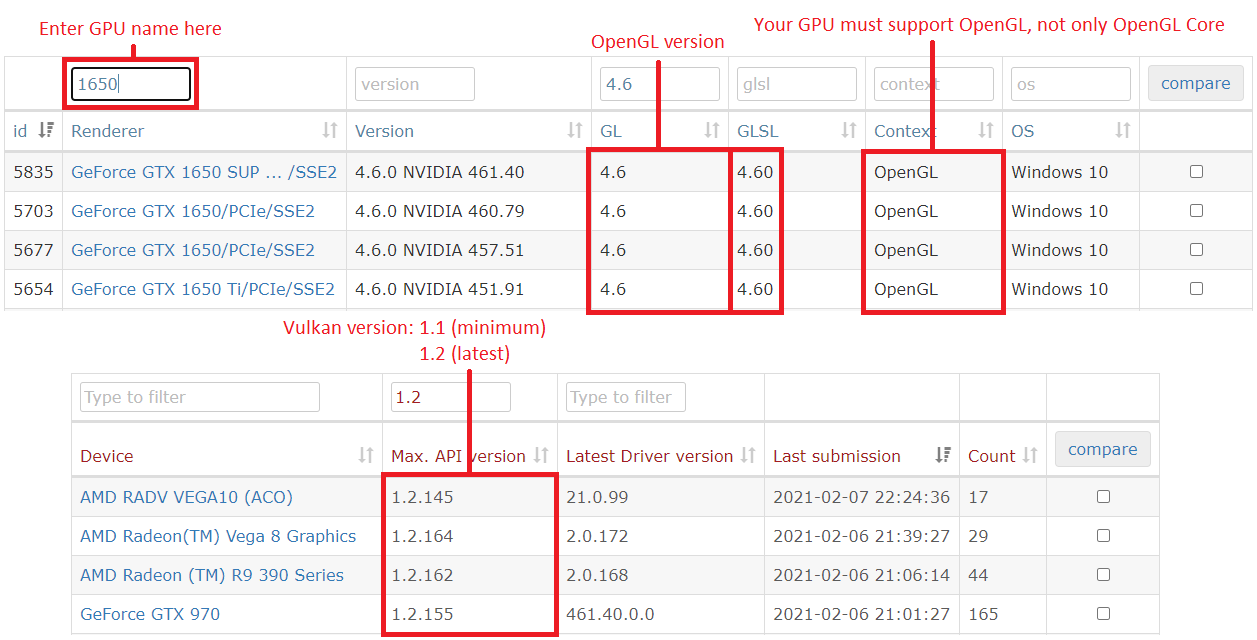
GPUs must support OpenGL 4.6 & OpenGL Compatibility profile, or Vulkan 1.1 (or higher).
To find out if your GPU meets these requirements, visit https://opengl.gpuinfo.org or https://vulkan.gpuinfo.org/ and check your GPU details.
Sample Image:
yuzu Quickstart Guide
To start playing commercial games, yuzu needs a couple of system files and folders from your switch in order to play them properly. To check if your Switch is hackable, visit https://damota.me/ssnc/checker and test your Switch’s serial number.
This guide will help you copy all your system files, games, updates, and DLC from your switch to your computer and organize them in a format yuzu understands. This process should take about 60 to 90 minutes.
IMPORTANT:
Make sure to place your Nintendo Switch into Airplane Mode before starting this guide.
System Settings -> Airplane Mode -> Airplane Mode "ON"
Prerequisites
- A Nintendo Switch vulnerable to the fusée gelée RCM exploit – Visit https://damota.me/ssnc/checker and test your Switch’s serial number
- An SD card with at least 30 GB of free space (an almost empty 32GB card will work)
- A USB-C to USB-A or USB-C to USB-C Cable to connect your Switch to your computer
- TegraRcmGUI – Download
TegraRcmGUI_v2.6_Installer.msi - Hekate – Download
hekate_ctcaer_X.X.X_Nyx_X.X.X.zip - Atmosphere – Download both
atmosphere-X.X.X-master-XXXXXXXX+hbl-X.X.X+hbmenu-X.X.X.zipandfusee.bin - Lockpick_RCM – Download
Lockpick_RCM.bin - nxdumptool – Download
nxdumptool.nro - nxDumpMerger – Download
nxDumpMerger_Windows.zip - TegraExplorer – Download
TegraExplorer.bin - microSD Card Reader – If your computer has one built-in, you can use that
- RCM Jig <– We highly recommend one like this, but you could use any of the methods outlined here
%YUZU_DIR% is the home directory for yuzu on your computer:
- For Windows, this is '%APPDATA%\yuzu' or 'C:\Users\{username}\AppData\Roaming\yuzu'
- For Linux, this is '~/.local/share/yuzu'
Preparing the microSD Card
- We will now prepare the microSD card.
- 1a. Extract the contents inside the
atmosphere-X.X.X-master-XXXXXXXX+hbl-X.X.X+hbmenu-X.X.X.zipandhekate_ctcaer_X.X.X_Nyx_X.X.X.zipfiles into the root of your microSD card. Just drag and drop the contents, do not create any new folders. - 1b. Rename the
hekate_ctcaer_X.X.X.binfile toreboot_payload.binand move it into theatmospherefolder. Replace the file when prompted. - 1c. Place the
fusee.bin,Lockpick_RCM.binandTegraExplorer.binfiles into thepayloadsfolder, which is inside thebootloaderfolder in your microSD card. - 1d. Create a folder named
nxdumptoolwithin theswitchfolder of your SD card and place thenxdumptool.nrofile inside it. - 1e. Once done, eject the microSD card and insert it into your Nintendo Switch.
- 1a. Extract the contents inside the
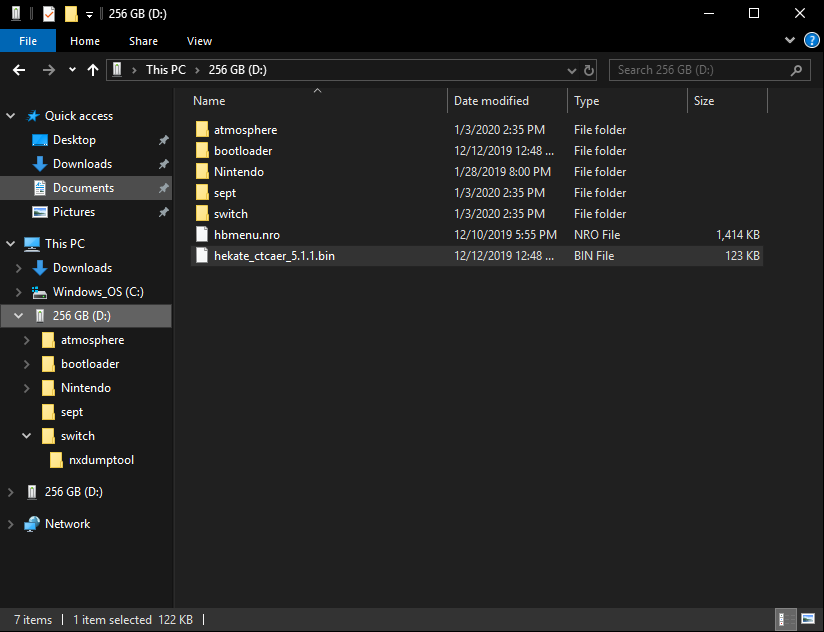
Your SD card should look like this.
Booting into RCM
- We will now boot your Nintendo Switch into RCM mode
- 2a. Run the TegraRcmGUI installer you downloaded from the prerequisites, and after installation, start the program.
- 2b. In the
Settingstab, click onInstall Driverwhich will install the drivers necessary for your computer to interface with your Nintendo Switch. - 2c. After the drivers have been installed, plug your Nintendo Switch into your computer.
- 2d. Power off your Switch while it is still connected to your computer.
- 2e. Insert your RCM jig into the right joy-con slot, make sure it is seated securely at the base, and then press VOL+ and Power buttons at the same time. Nothing should happen on your Switch; if the switch starts to turn on normally, go back to the beginning of step 2d and try again.
- 2f. If you see the Nintendo Switch icon in the lower left corner flash green and state
RCM O.K., your switch has successfully entered RCM mode.
Booting into Hekate
- We will now boot your Nintendo Switch (already in RCM mode) into Hekate, a custom bootloader.
- 3a. Extract the
hekate_ctcaer_X.X.X.binfile from thehekate_ctcaer_X.X.X_Nyx_X.X.X.zipfile you downloaded from the prerequisites to any accessible directory on your computer. - 3b. Run TegraRcmGUI. In the
Payloadtab of TegraRcmGUI, click on the folder icon and navigate to thehekate_ctcaer_X.X.X.binfile you extracted earlier. - 3c. Click on
Inject Payloadand your Switch will boot into the Hekate menu.
- 3a. Extract the
Mounting the microSD card to your computer in Hekate
NOTE: These steps will be used in other sections below. Do not follow this section yet if you are booted into Hekate for the first time. Skip to the next section for now.
-
We will now mount the microSD card as a drive from your Switch to your computer in Hekate, via USB.
- 4a. In the Hekate Home menu, tap on the
Toolstab to show the Tools menu. - 4b. Tap on
USB Tools. - 4c. Tap on
SD Card. Your SD card should now be mounted as a drive to your computer.
To unmount the SD card: Safely eject the drive from your computer and tap on
Closefrom your Switch’s screen. - 4a. In the Hekate Home menu, tap on the
-
We will now return to the Hekate Home menu.
- 5a. Tap on
Closeagain to return to the Tools menu. - 5b. Tap on the
Hometab to return to the Hekate Home menu.
- 5a. Tap on
Dumping Prod.keys and Title.keys
- We will now dump your
prod.keysandtitle.keysfor decryption of your game files.- 6a. Boot your Nintendo Switch into RCM mode (steps 2c. to 2f.) and make sure it is connected to your computer.
- 6b. Boot into Hekate (steps 3b. to 3c.)
- 6c. When it has successfully booted into the Hekate menu, tap on
Payloads. This will show a list of payloads. - 6d. Tap on
Lockpick_RCM.binin the list of payloads. - 6e. After Lockpick_RCM has successfully booted, press the power button to select
Dump from SysNAND. - 6f. Wait for it to finish deriving the keys.
- 6g. After Lockpick_RCM has finished deriving the keys, please make note of the location of the key files. Default is:
sd:/switch/prod.keysandsd:/switch/title.keys. - 6h. Press any button to return to the menu, then navigate with the VOL+/VOL- buttons to highlight and select
Reboot to hekateby pressing the power button. You should now be booted back into Hekate. - 6i. Mount the SD card to your computer in Hekate (steps 4a. to 4c.)
- 6j. Navigate to your SD card drive and copy both
prod.keysandtitle.keysto the%YUZU_DIR%/keysdirectory. - 6k. Once you’re done copying, safely eject the SD card drive in your computer and return to the Hekate Home menu. (steps 5a. to 5b.)
Backing up Switch NAND (Optional but Recommended)
- We will now boot Hekate to dump your switch’s NAND. This step is optional, but highly recommended to ensure you have a backup of your Switch’s data in its internal storage.
- 7a. Boot your Nintendo Switch into RCM mode (steps 2c. to 2f.) and make sure it is connected to your computer.
- 7b. Boot into Hekate (steps 3b. to 3c.)
- 7c. When it has successfully booted into the Hekate Home menu, tap on the
Toolstab and selectBackup eMMC. - 7d. Underneath the
Fullsection, tap oneMMC BOOT0 & BOOT1. This may take a few seconds to load. After it is finished filling the progress bar it should sayFinished and verified!. BeneathFilepath:you will see the location of the dump. - 7e. Tap on
Closeand selecteMMC RAW GPP. This should take some time as the Switch’srawnand.binis quite large. If the progress bar appears to go backwards at some points or turn green, do not worry as this is Hekate verifying the data. This should take between 15-45 minutes depending on the quality/speed of your SD card and the default verification setting. Please keep note of the location the output file is placed. - 7f. Tap on
Closetwo times to return to the Tools menu. - 7g. Mount the SD card to your computer in Hekate (steps 4b. to 4c.)
- 7h. Navigate to your SD card drive and copy the
backupfolder to your computer. - 7i. Once you’re done copying, safely eject the SD card drive in your computer and return to the Hekate Home menu. (steps 5a. to 5b.)
Dumping System Update Firmware
- Some games such as
Mario Kart 8 Deluxerequire the use of files found inside theNintendo Switch System Update Firmwareto be playable. In this step, we will now dump the firmware files from your Switch for use in yuzu.- 8a. Boot your Nintendo Switch into RCM mode (steps 2c. to 2f.) and make sure it is connected to your computer.
- 8b. Boot into Hekate (steps 3b. to 3c.)
- 8c. When it has successfully booted into the Hekate Home menu, tap on
Payloads. This will show a list of payloads. - 8d. Tap on
TegraExplorer.binin the list of payloads. - 8e. After TegraExplorer has successfully booted, navigate through the menu using the
VOL+/VOL-buttons to highlight and select theFirmwareDump.teoption by pressing thePOWERbutton. - 8f. Select the
Dump sysmmcoption - 8g. Once the dumping process is finished, the
.ncafiles will be located in your SD card atsd:/tegraexplorer/Firmware/<firmware version>. - 8h. Press any button to return to the main menu.
- 8i. Select the
Reboot to bootloader/update.binoption. You should now be booted back into Hekate. - 8j. Mount the SD card to your computer in Hekate (steps 4a. to 4c.)
- 8k. Navigate to your SD card drive and copy the contents in the firmware folder (step 8f.) to
%YUZU_DIR%/nand/system/Contents/registered. Alternatively, you can write%appdata%\yuzu\nand\system\Contents\registeredin the address bar of a file explorer. Theregisteredfolder should be full of.ncafiles. - 8l. Once you’re done copying, safely eject the SD card drive in your computer and return to the Hekate Home menu. (steps 5a. to 5b.)
Dumping Cartridge Games
- We will now dump the
Cartridge Image (XCI)file from your game cartridge(s), to use in yuzu. Insert the game cartridge of your choice.- 9a. Boot your Nintendo Switch into RCM mode (steps 2c. to 2f.) and make sure it is connected to your computer.
- 9b. Boot into Hekate (steps 3b. to 3c.)
- 9c. When it has successfully booted into the Hekate Home menu, tap on
Payloads. This will show a list of payloads. - 9d. Tap on
fusee.binin the list of payloads. - 9e. Your Switch will launch into Custom Firmware Mode (CFW), and once your Switch has booted into the HOME Menu, press and hold the
Rbutton on your controller and launch a game. This will launch the Homebrew Menu intitle override mode. - 9f. Either use the touchscreen or navigate using your controller, and select
nxdumptool. - 9g. Select the
Dump gamecard contentoption. - 9h. Select the
Cartridge Image (XCI) dumpoption. - 9i. Once the cartridge image has been dumped, press any button to return to the previous menu and then press
+to return to the Homebrew Menu. - 9j. Select
Reboot to Payloadand then press-on your controller to return to the Hekate Home menu. - 9k. Mount the SD card to your computer in Hekate (steps 4a. to 4c.)
- 9l. Navigate to your SD card drive. XCI dumps are located under
sd:/switch/nxdumptool/XCI. - 9m. If your XCIs are dumped in parts with
.xc0,.xc1,.xc2, etc extensions, use thenxDumpMergertool you have downloaded in the prerequisites to assist in merging these parts into a complete XCI. If they were dumped as complete XCI files with the.xciextension, you can proceed to copy these to a game directory of your choice. - 9n. Extract the contents of
nxDumpMerger_Windows.zipinto a new folder and start the program. - 9o. Select the button with the triple dots
...next to theInputfield. This will open a file selector. - 9p. Find and select one of the parts and click
Open. - 9q. Next, select the button with the triple dots
...next to theOutputfield. This will open a folder selector. - 9r. Select a folder where you would like your games stored in your computer and then click
Select Folder. (NOTE: Do not select a folder inside the SD card or you will quickly run out of space and experience slow transfer speeds in the merging process.) - 9s. After completing these steps, the parts are ready to be merged. Select
Merge Dumpand the program will merge the parts into a complete XCI located in theOutputfolder. Repeat these steps for all other games dumped as parts. - 9t. Once you’re done merging, safely eject the SD card drive in your computer and return to the Hekate Home menu. (steps 5a. to 5b.)
Dumping Installed Titles (eShop)
- We will now dump the
Nintendo Submission Package (NSP)file from your installed eShop game(s), to use in yuzu.- 10a. Boot your Nintendo Switch into RCM mode (steps 2c. to 2f.) and make sure it is connected to your computer.
- 10b. Boot into Hekate (steps 3b. to 3c.)
- 10c. When it has successfully booted into the Hekate menu, tap on
Payloads. This will show a list of payloads. - 10d. Tap on
fusee.binin the list of payloads. - 10e. Your Switch will launch into Custom Firmware Mode (CFW), and once your Switch has booted into the home menu, press and hold the R button on your controller and launch a game. This will launch the Homebrew Menu in
title override mode. - 10f. Either use the touchscreen or navigate using your controller, and select
nxdumptool. - 10g. Select the
Dump installed SD Card / eMMC Contentoption. - 10h. Select the game you want to dump.
- 10i. Select the
Nintendo Submission Package (NSP) dumpoption. - 10j. If your game contains an update or DLC, you will see multiple dumping options such as
Dump base application NSP,Dump installed update NSPor/andDump installed DLC NSPin the next screen. SelectDump base application NSPto dump the base game. - 10k. Select the
Start NSP dump processoption and wait for the dumping process to finish. - 10l. Press the
B buttonto return to the previous menu(s) and repeat the previous steps to dump the base, updates and DLC of all your games. - 10m. Once all your games are dumped, press any button to return to the previous menu and then press
+to return to the Homebrew Menu. - 10n. Select
Reboot to Payloadand then press-on your controller to return to the Hekate Home menu. - 10o. Mount the SD card to your computer in Hekate (steps 4a. to 4c.)
- 10p. Navigate to your SD card drive. NSP dumps are located under
sd:/switch/nxdumptool/NSP. - 10q. If your NSPs are dumped as folders with
00,01,02, etc parts within them, use thenxDumpMergertool you have downloaded in the prerequisites to assist in merging these parts into a complete NSP. If they were dumped as files, you can proceed to copy these to a game directory of your choice. - 10r. Extract the contents of
nxDumpMergerinto a new folder and start the program. (Skip the extraction if you already followed step 9n.) - 10s. Select the button with the triple dots
...next to theInputfield. This will open a file selector. - 10t. Find a NSP that is dumped as a folder with parts. Select one of the parts within the folder and click
Open. - 10u. Next, select the button with the triple dots
...next to theOutputfield. This will open a folder selector. - 10v. Select a folder where you would like your games stored in your computer and then click
Select Folder. (NOTE: Do not select a folder inside the SD card or you will quickly run out of space and experience slow transfer speeds in the merging process.) - 10w. After completing these steps, the parts are ready to be merged. Select
Merge Dumpand the program will merge the parts into a complete NSP located in theOutputfolder. Repeat these steps for all folder NSPs. - 10x. Once you’re done merging, safely eject the SD card drive in your computer and return to the Hekate Home menu. (steps 5a. to 5b.)
Dumping Save Files (Optional)
- We will now dump the games’ save files from your switch to use in yuzu.
- 11a. Download JKSV.nro
- 11b. Boot your Nintendo Switch into RCM mode (steps 2c. to 2f.) and make sure it is connected to your computer.
- 11c. Boot into Hekate (steps 3b. to 3c.)
- 11d. Mount the SD card to your computer in Hekate (steps 4a. to 4c.)
- 11e. Navigate to your SD card drive and place the
JKSV.nrofile inside theswitchfolder. - 11f. Once you’re done, safely eject the SD card drive in your computer and return to the Hekate Home menu. (steps 5a. to 5b.)
- 11g. Tap on
Payloads. This will show a list of payloads. - 11h. Tap on
fusee.binin the list of payloads. - 11i. Your Switch will launch into Custom Firmware Mode (CFW), and once your Switch has booted into the home menu, press and hold the
Rbutton on your controller and launch a game. This will launch the Homebrew Menu intitle override mode. - 11j. Either use the touchscreen or navigate using your controller, and choose
JKSV. - 11k. Move up or down to select a source to dump save data for a single game. (Most save files are stored under the user account of choice. Some save data are located under Device, such as Animal Crossing: New Horizons.)
- 11l. For dumping all save data at once from selected source: Press
Xand then select theDump All for <source name>option. - 11m. For dumping save data of a single game: Press
Aand then select the game of choice, then pressAagain and select theNewoption. - 11n. JKSV will being up the keyboard to set a name for your save data folder. By default, it generates a name containing the source name (user account, Device, etc.) alongside the date and time of when it was dumped, else you can name it to whatever you want. Once you’re done, press
+to dismiss the keyboard. - 11o. Once you’re done dumping, press
+to close JKSV. - 11p. Select
Reboot to Payloadand then press-on your controller to return to the Hekate menu. - 11q. Mount the SD card to your computer in Hekate (steps 4a. to 4c.)
- 11r. Navigate to your SD card drive. Your save files will be located in
sd:/JKSV/<name of the game>/<folder name from step 11n>/. - 11s. Follow the instructions in the How do I add a Save to my Game section of our FAQ.
- 11t. Once you’re done transferring your save files, safely eject the SD card drive in your computer and return to the Hekate Home menu. (steps 5a. to 5b.)
Rebooting the Switch Back to its Original State
- If you’re done following the sections you needed for yuzu, we will now reboot the Switch back to its original state.
- 12a. From the Hekate Home Menu, tap on
Reboot. - 12b. Tap on
OFW. - 12c. Your Switch will now reboot into the original firmware.
- 12a. From the Hekate Home Menu, tap on
Running yuzu
- We will now run yuzu to verify that your dumped keys and games are being read correctly.
- 9a. Run either the
yuzuoryuzu Early Accessshortcuts that were created by the yuzu installer tool. - 9b. in yuzu, click on
+ Add New Game Directoryin the browser, and navigate to the folder where you placed yourXCIorNSPfiles. - 9c. To install game Updates and/or DLC. In yuzu, click
File >> install to NANDand navigate to your dumped Update-DLC files. For more info refer to How do I install game Updates or DLC
- 9a. Run either the